Tutorial 2-1: Configuring a new C# Project
All WMX3 functions that are available in the WMX3 C++ library are also available in the WMX3 .NET library. This tutorial covers the same steps as Tutorial 1: Creating a C++ Project, but using the C# language and the WMX3 .NET library.
Create a C# project in Microsoft Visual Studio. Here, the Console Application template is selected.

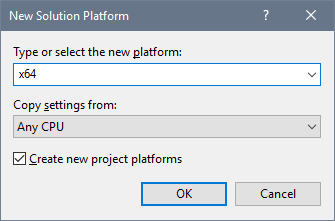
If you are using the 64-bit version of the WMX3 library (if you are using RTX64), the Platform must be changed from Any CPU to x64. This step can be skipped if you are using the 32-bit version of the WMX3 library. Open the Configuration Manager by selecting Configuration Manager under the Build menu. In the Configuration Manager, click on the menu under “Active solution platform”, and select “New”. Under “Type or select the new platform”, select x64, and click on OK.

Open the reference manager by right clicking on References in the Solution Explorer and selecting “Add Reference…”. In the reference manager, click on Browse.

Navigate to the Lib folder in the WMX3 installation directory (“C:\Program Files\SoftServo\WMX3\Lib” by default) and select the following libraries (multiple libraries can be selected using the Ctrl key): AdvancedMotionApi_CLRLib.dll, ApiBufferApi_CLRLib.dll, CompensationApi_CLRLib.dll, CoreMotionApi_CLRLib.dll, CyclicBufferApi_CLRLib.dll, EventApi_CLRLib.dll, IOApi_CLRLib.dll, LogApi_CLRLib.dll, UserMemoryApi_CLRLib.dll, WMX3Api_CLRLib.dll.

Except for WMX3Api_CLRLib.dll, these libraries are optional and may be omitted if the function contained will not be used by the application.
Click on OK to close the reference manager.
Windows applications built using the WMX3 library require the IMDll.dll dynamic link library to be in the application directory to run. This DLL can be manually copied to the application directory from the WMX3 library directory (by default “C:\Program Files\SoftServo\WMX3\lib”), or a post-build event can be defined to automatically copy the DLL every time the application is compiled.
If IMDll.dll is not copied to the application directory, an exception will be generated immediately after execution.
To define a post-build event, open the project property pages by selecting …Properties under the Project menu. Navigate to the “Build Events” tab and enter the following line under “Post-build event command line”:
copy /y "C:\Program Files\SoftServo\WMX3\lib\IMDll.dll" "$(TargetDir)"

This concludes the configuration of the C# project. See the following sections for additional information regarding how to use the WMX3 .NET libraries.